When The Air, Not The Lens, Messes Up Your Shot
There is always an opportunity to learn for the observant photographer. And if you aren’t afraid of equations and have The Internet available to you, then you can read up in The Wikipedia and a few smart physics sites to understand the effect which you observed in the field. So, a few weeks ago, me and my mate Rainer Praschak, birdwatcher extraordinaire (and active in Austria’s environmental party) went to Lake Neusiedel in Austria’s far East, close to the Hungarian border, to watch some birds. This area is quite rich in wading birds. Rainer brought the heavy artillery, composed of

and

and

This is a 400 mm lens, with a 2x extender, mounted on a camera with a 1.4x cropped sensor.
→ 400 x 2 x 1.4 = 1120 mm equivalent.
A 50 mm photographic lens is roughly equivalent to the field of view of a human eye. A 1120 mm lens is thus about a 22 x magnification. With this setup the bird photographer can shoot small birds a hundred meters away. Very nice. But there are some problems: Any shaking of the camera will blur the image much more than it would when photographing with a shorter focal length lens (like a standard 50 mm lens).
Solution 1 (oldschool): we used a fast shutter speed (< 1/1000 second) to minimize the role of lens movements.
Solution 2 (oldschool): we used a tripod to stabilize the lens.
Solution 3 (newschool): we used the lens’ advanced stabilization system. It’s a set of small gyroscopes and motors which counteracts small lens movements. These systems have become more powerful and widespread within the last 15 years.
Even with all of this high-tech hardware, we weren’t super happy with the sharpness of out shots. Here is one example of a wading bird shot with Iso400, 1/2000, f9:
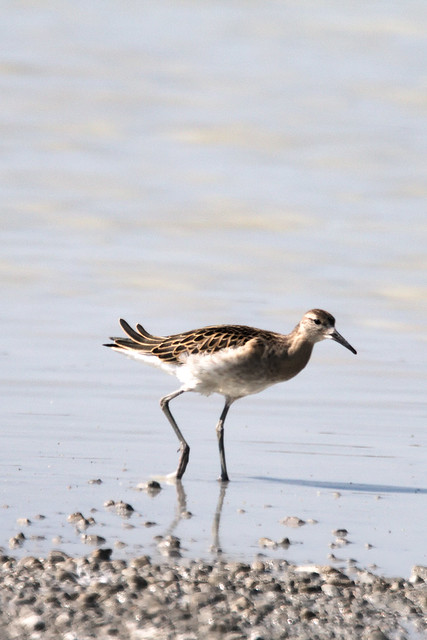
Why is this image not as sharp as we as ace nature photographers would like it to be?
The distance between us and the bird was an estimated 25 meters. In-between was early autumn Austrian mid-day air, at about 20C, above a dry, flat patch of grassland, and some sand. The unusually nice weather this autumn in central Europe meant that the sun was shining at full power, and heating up the ground. What ensued were turbulences due to natural convection. The air right above the warmer ground was rising up, and it did so in an uneven manner – more so bigger the temperature difference was. The air moved around in swirls and eddies, and blurred the image on the photographs we took. It was not an issue with the lens which lead to reduced image quality, but an issue with the air between the camera and the subject. This is not unlike the situation in underwater photography, where the water between the subject and your camera degrades the image quality. Normally air is so much clearer and more homogeneous than seawater and topside-photographers don’t have to worry about the effects of air. But photography with a telephoto lens over an area with convection is an exception.
The exact shapes and shape changes of the swirls and eddies is are a very, very complicated issue and a hot topic in physics. In order to precisely predict what will happen and what kinds of swirls you can get you need a huge computer (a supercomputer) and a lot of equations to feed it. But we do not need to understand exactly what is happening, just an order-of-magnitude estimate of where & when we will observe turbulence.
Basically, if convection happens depends on the Rayleigh number, which is:
Ra=αgΔTL3/κν,
In words, the Rayleigh number is the temperature difference multiplied by the height of the system to the third power, (and multiplied by two constants), divided by the product of the viscosity of the medium (air or water or honey…) & its thermal conductivity (how well heat travels through it). To put it in simpler terms: The Rayleigh number depends on a few properties of the gas or liquid which is heated from below, the temperature difference and the height of the system we are looking at (to the third power).
In a cylinder which is much, much wider than high, the Rayleigh number has to be larger than 1708 for convection to occur. Hence, there is a minimal temperature difference and a minimal height that’s needed.
There are some solutions to this dilemma of heat-difference induced turbulence in telephoto photography:
– Get closer. You will encounter less convection streams in-between bird and lens. Easier said than done. Birds fly away when approached. That’s why Rainer and I brought a long lens in the first place.
– Go and shoot from an elevated position. That sometimes works, if there is an observation tower, ect. As we saw above, the Rayleigh number depends on L3. In a rough estimate, moving 2 times higher up will reduce your convection blur 8 times.
– Pick the right time of the day. In the early morning when the sun is not so strong yet, convection-powered turbulences will be weaker. The same should be true in the afternoon, once the air has warmed up and the sun is already weaker (the temperature difference will be less). That will vary depending on the ground, weather and time of the year. Pick a time of the day when the temperature difference between air and ground is the least.
– Just look. Sometimes you just can’t take good pictures. As an underwater photographer I know that all too well. Bad viz, too little light, and frikle fish make it impossible to get a decent shot. Too much convection can do the same thing on land. Enjoy the view and don’t waste your time fiddling with your camera.
Online resources I read to get up to speed on convection turbulences:
http://www.cora.nwra.com/~werne/eos/text/turbulence.html
https://physics.aps.org/articles/v2/74
https://en.wikipedia.org/wiki/Natural_convection
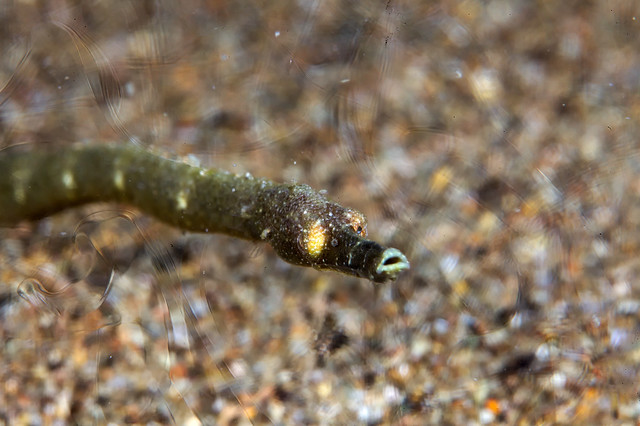
PS: This is one rare example where I photographed convection eddies: I took this underwater in Dauin, where geothermal activity heats the sand and the heated seawater rises from above. And the Rayleigh number is large enough for convection to occur!